Aspect Ratio
...or why can't I print a full frame image on standard paper sizes
“As a photographer, we are faced with losing parts of our images when printing them out depending on the size of the print. Customers too wonder why they can not have the entire image on there print. The frustration this causes can not be avoided. I came across this great example and wanted to share it with you. I hope this information can and will allow you to see image size versus the crop a print may receive to your printed products.” Troy Wegner
Aspect Ratio is the ratio of the short size of an image to the long side of the image. We talk about it all the time without realizing it. When you get a 4x6 inch print you are describing the aspect ratio of that print: 4x6 (or 2x3, or 1x1.5). The length long side of the image is 1.5 times the length of the short size.
This happens to be the aspect ratio of most digital SLR cameras. These cameras evolved from 35mm film SLR cameras. 35mm film actually measures 24mm x 36mm (do the math, that translates to 2x3 or 1x1.5). Hence a 4x6 print can show the entire frame from a 35mm slide/negative or from most DSLR cameras. I say most because Olympus has SLR cameras with a 3:4 ratio, and most compact digital cameras are also in the 3:4 ratio. But that is not typical for DSLR cameras. I will talk about 3:4 ratio at the end of this discussion.
So, what happens when you want to make an enlargement from your DSLR image? If you make an 8x12 enlargement you will get the full frame. Everything you originally saw in the image. But, you might be saying, most frames are available in 5x7 or 8x10 sizes. What happens when I make a 5x7 or 8x10 print? What happens is that you either have to crop off parts of the original image, or you have to print with uneven borders (the borders on the long dimension will be wider than those on the short sides. The physical dimensions/aspect ratio of the image and the frame are not the same. Something has to go.
Here is an illustration:
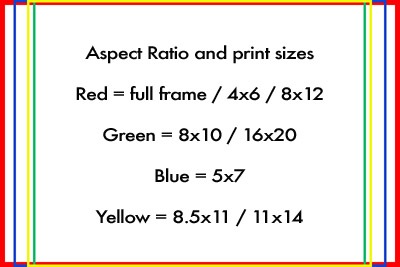
The red line indicates the full 1x1.5 ratio of the DSLR original file. The other lines show the area of the image that will be included in various size prints.
The green lines shows the crop for an 8x10 or 16x20 (1x1.25 aspect ratio). Notice that a relatively large section of the original will be cropped out to make an 8x10 print.
The blue lines show the crop area for a 5x7 print (almost the full frame).
The yellow lines show the approximate crop area for an 8.5x11 or 11x14 print.
As mentioned above, there is an alternate way to print. You can have uneven borders, as illustrated below:
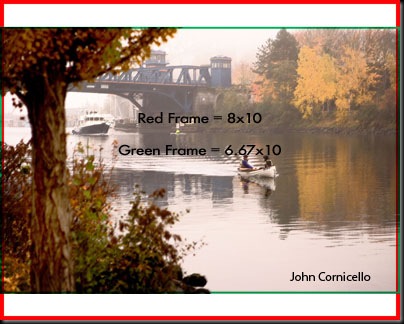
Here you are printing the full image frame (shown by the green lines) on 8x10 paper (red outline) at a size of about 6.67 inches by 10 inches, leaving a wide white border along the long dimensions of the print.
Another illustration:
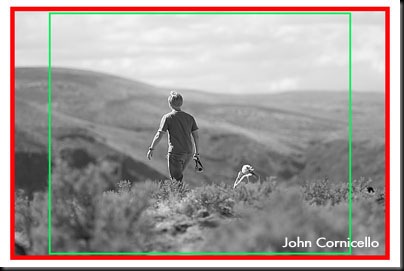
The red frame shows the full image as captured by the camera. The green frame shows the part of the image that can be printed as an 8x10 inch print. Of course that green frame can be moved left or right in the image for the best composition.
Another way to think about this is to divide the long dimension of your original image by the short dimension and then divide the long/short dimension of your frame size and see if they match up. For example, take your original image that is 2:3 ratio. Divide 2 into 3 and you get 1.5. Now take your frame size. First we will try an 8x12 frame. 12 divided by 8 equals 1.5. The number is the same. The original image will scale to 8x12 with no cropping necessary. Second we will try an 8x10 frame. 10 divided by 8 equals 1.25. This does not match the original 1.5, so the image cannot be scaled to 8x10 without cropping.
One more illustration:
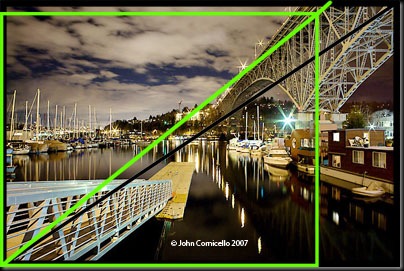
Note the black diagonal line from corner to corner of the image. That shows various crops within the image that will maintain the 1:1.5 aspect ratio. The green border and diagonal line indicate the available 8x10 (1:1.25) crops available from this image. Any rectangle who's corners fall on the diagonal green line can be a 8x10 crop from the image.
Here are the some common aspect ratios and print sizes:
Aspect Ratio
Sample Print sizes (no cropping required)
1:1.5
2x3, 4x6, 8x12, 16x24, 20x30, 32x48
1:1.25
4x5, 8x10, 16x20, 24x 30, 32x50
1:1.3
11x14
1:1.4
5x7
3:4 Ratio -- or the 4/3 system
Traditionally, televisions and personal computers have had screens with a 4:3 (width to height) aspect ratio. Computer screens have come in 640x480, 800x600, 1024x768, 1280x960, etc. As compact digital cameras were being developed the 4:3 ratio was adopted by most manufacturers. This way digital camera images fit the computer screens. But they don't fit traditional photographic printing paper sizes.
Here is a 4:3 aspect ratio image with 8x10 (green) and 5x7 (blue) crop guides on it.
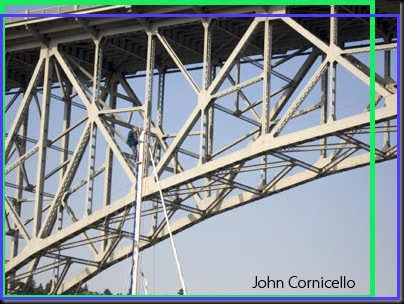
The 4:3 aspect ratio translates to 1:33333 and gives you un cropped print sizes like 10.5x14, 9.6x12.8, 9x12, 7.5x10, or 4.5x6. Not your typical print sizes. But these do work well for online, full-screen presentation.


